Thursday, September 22, 2011
Character Sculpt: Sunata
I am glad to announce my next character sculpture is based off the main character, Anna, From the extremely talented Designer/Animator Chris Makerewich, From his animated short, SUNATA. All of Chris's character designs make use of straights and curves so well that the drawings themselves feel sculpture, which made it hard to not enjoy every minute of helping create Anna in a 3d form... Hope it lives up to the epic 2D design Chris! Thanks Again for the opportunity.
Here's Chris Makerewich's animated Short, SUNATA
More of Chris's Art/ Designs can be found at it blog..
http://makerewich.blogspot.com/
Thursday, July 28, 2011
Character Sculpt: BJOR
I am happy to announce that I got yet another chance to further my sculpting style range while sculpting the designs of a close friend, Nik Ilic. Nik's characters, props and layout's offer extremely appealing shapes/colors and proportions making it not only fun but interesting difficult to recreate such and appeal in a 3d form. This is my Sculpt of BJOR the viking created by Nik Ilic.
More of Nik's designs and work can be found at his blog...
http://nikolas-ilic.blogspot.com/
Saturday, July 23, 2011
Character Sculpt: Satori
For the past four years I have been achieving my graduate degree in animation at Sheridan college. I have spent my time drawing and creating art around some of the most talented artists i know. It wasn't until I finished that I realized how blessed I was to consistently see so many styles and approaches to creating interestingly believable/ lovable characters. Being so I reached out to fellow artist asking them if it would be ok to sculpt there personal sytle'd characters. I plan to not only extend the diversity of my sculpting ability and portfolio but also give fellow artist the chance to see their 2d characters in a 3 dimensional form.
This character, Pandey, was created by the very talented Abhilasha Dewan! Pandey is the Main character of Abhilasha's Short Film Satori...
Here's Abhilasha's short film- Satori
This character, Pandey, was created by the very talented Abhilasha Dewan! Pandey is the Main character of Abhilasha's Short Film Satori...
Here's Abhilasha's short film- Satori
Satori from Abhilasha Dewan on Vimeo.
The film and more can be found on Abhilasha's web site..
http://abhilashadewan.com/
Here is the Sculpture I created based off one of my favorite scenes from Abhi's film. Unfortunately I couldn't create appealing enough looking sunglasses so I decided to leave them off..
Tuesday, July 19, 2011
How to Create Your Own Sculpture
Step One: Acquire Materials
For Materials you will need, 24 and 12 gauge steel wire, Pliers, A Brick of Sculpy, a Wooden Plaque, two part apoxy putty, tin/ aluminum foil and sculpting tools.
Step Two: Creating Armature
First eye feet spacing on piece of wood, and drill two wholes for armature wire to fit in into wood. Next using your drawings of the character rough out an armature design over top like so.
Then braid a 12 gauge steel and bend it into shape of your rough design and apoxy feet into base of the wood.
Step Three: Creating the Arms & Hands
Using the 12 gauge steel wire braid a length of wire to create the arm like so, while also taking the 1/16 aluminum wire and create a silhouette of the hand. Next Braid the fingers and wrap the hand wires around the arm wire like so.. finish off by adding two part apoxy putty to the center of the hand to keep the fingers and thumb in place.
Step Four: Creating Complete Under Structure
Using apoxy attach arms to shoulders & create a slimmer silhouette of the determined final shape with tin foil like so.. (Hold tin foil in place with a extremely thin wire such as a 24 gauge)
Step Five: Applying Sculpy
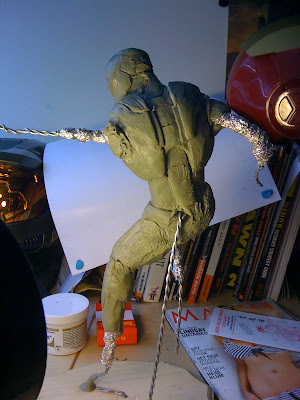
Next start balling up little balls of sculpy and roll them into noddle like shapes and start applying to armature to start building a desired silhouette like so.. dont be afraid of leaving places of the shape bigger and smaller because you will be moving all the sculpy around to create final shape anyways.
Step 6: Finessing Sculpy
Now using your favorite sculpting tools push around and smooth out noodles to create a complete base shape like so.. after which you can start adding final details such as ears, hair, eyes, mouth, fingers, rings and clothing details.
Step 7: Creating Briefcase
Firstly create a skeleton of the briefcase with tin foil while creating the handle with 1/16 aluminum wire wrapped with 24 gauge steeling wire for grip when applying sculpy. finsih off by adding sculpy and bake in house hold oven for 15 mins at 275 degrees.
Step 8: Final Product
For Materials you will need, 24 and 12 gauge steel wire, Pliers, A Brick of Sculpy, a Wooden Plaque, two part apoxy putty, tin/ aluminum foil and sculpting tools.
Step Two: Creating Armature
First eye feet spacing on piece of wood, and drill two wholes for armature wire to fit in into wood. Next using your drawings of the character rough out an armature design over top like so.
Then braid a 12 gauge steel and bend it into shape of your rough design and apoxy feet into base of the wood.
Step Three: Creating the Arms & Hands
Using the 12 gauge steel wire braid a length of wire to create the arm like so, while also taking the 1/16 aluminum wire and create a silhouette of the hand. Next Braid the fingers and wrap the hand wires around the arm wire like so.. finish off by adding two part apoxy putty to the center of the hand to keep the fingers and thumb in place.
Step Four: Creating Complete Under Structure
Using apoxy attach arms to shoulders & create a slimmer silhouette of the determined final shape with tin foil like so.. (Hold tin foil in place with a extremely thin wire such as a 24 gauge)
Step Five: Applying Sculpy
Next start balling up little balls of sculpy and roll them into noddle like shapes and start applying to armature to start building a desired silhouette like so.. dont be afraid of leaving places of the shape bigger and smaller because you will be moving all the sculpy around to create final shape anyways.
Step 6: Finessing Sculpy
Now using your favorite sculpting tools push around and smooth out noodles to create a complete base shape like so.. after which you can start adding final details such as ears, hair, eyes, mouth, fingers, rings and clothing details.
Step 7: Creating Briefcase
Firstly create a skeleton of the briefcase with tin foil while creating the handle with 1/16 aluminum wire wrapped with 24 gauge steeling wire for grip when applying sculpy. finsih off by adding sculpy and bake in house hold oven for 15 mins at 275 degrees.
Step 8: Final Product
Monday, July 4, 2011
Bill Murray (Ghostbusters) Caricature(In the Works): Hard Plasticine
Wednesday, June 29, 2011
Subscribe to:
Posts (Atom)